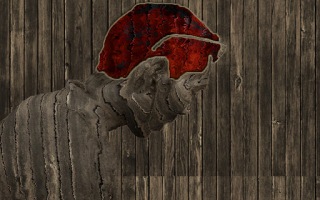
This is just a simple tutorial using the basic filter in photoshop. Only if we are not observant kadang2 not know the function of each filter the number seabrek. Maybe there is not follow-up reading, so I'll share it on the blog for more afdol itung itung rewarding scienceImmediately! We will create images like thisSTEP 01We prepared two image. The first picture that we will manipulate.The second texture we will use later. Make the same size of the second image, so that later when the process is easy to combine. I use a size of 800 x 500px, 150dpi.STEP 02 Save photo image (not textures) with ext. PSD, about the name of the file is up to you.STEP 03Open the texture file that we have prepared from scratch earlier in photoshop. Now it's time we will create a contour as a basic for this tutorial.We will use a filter called displacement (Filter> Distort> displacement).After clicking the displacement, it will exit the new window. Enter 50 in the Horizontal Scale tilapia and -50 on the Vertical Scale. The assumption was that the higher the value of the resultant distortion will be more solid. Then in the Displacement Map and select Stretch to Fit Undefined Areas to select Wrap Around. Click OK, then it will exit the new window where we must choose a PSD file. Choose the image file that we have stored dg ext PSD in the beginning.Once we enter the picture with the displacement filter before, we have created new distortions in the shape of the texture images that we insert.STEP 04This is an important stage where we will make photos into berteksture. Steps: Import images (*. PSD) which we prepared at the beginning. Can use an alternative Place or drag n drop.Remember, we make an image with a texture that we have had makeovers. put your photo on the top layer.Change the picture to black and white with Desaturate - (Images> Adjustments> Desaturate). After that, if necessary retouch, please adjust your photos from LBH contrast, eg using Levels, Curves ato Brightness / Contrast. Then copy the image files tersbut into 3 layers. Sequentially from the bottom, change the layer blending mode masing2 1. Softlight - 2. Saturation - 3. MultiplySTEP 05Eye and hair coloring. insert the original image file (which blm B / W) into the document. dilayer put on top. The point we would just take the hair and the eyes of the object. For this step, agan can use the pen tool or masking. Ane masking more prefer to be more easily revised if there kesalahan2.
Tidak ada komentar:
Posting Komentar
apakah bermanfaat, ditunggu komentar anda. (apasaja).....